
Hardware Planning & Installing Tips
GDHD/Re-Source INSTALL TIPS:
If you are uncomfortable using basic hand tools, please consider hiring a professional garage door company. Professional Door Installers can be found at www.doors.org or by contacting us. We also offer a magnetic fasteners line of decorative hardware that requires no installation tools but will only work on metal doors.
These install tips are designed for an experienced handy person. We sell hardware for the exterior of your door or interior garage door hardware. Since your door is the largest moving object in your home, never attempt to make adjustments and/or modifications to your interior garage door hardware. This includes garage door torsion or extension springs, door rollers, cable brackets, cables, door panels, and electric openers without prior garage door experience. Serious injury, death, and/or damage can occur. The customer assumes all liabilities, damages, or injuries in using, handling, or installing any products sold by GDHD Inc and their supplier/suppliers. Our products are not used to secure, access, open, or lift any door, gate, or shed.
Our hardware is strictly for decorative use only.
Where to place my hardware?
People often ask where to install our hardware? While there is no industry standard for decorative hardware placement other than trying to "balance the look," it is truly up to the owner. It's a personal choice as long as it does not interfere with the operation of your door.
That being said, applying hardware to one side or off-center can give an "unbalanced appearance" to your doors. Most manufacturers apply strap hinges to one of the four corners of a door and center the pull handles or door rings on the center vertical door stile or flat area in the center of doors. The "stile" is the flat area between the square panel areas if your door has metal square raised or flat panel designs on the outside. Or the center trim boards if your door has an overlay carriage house door design. If you have a two-car door, one larger than 14' wide, you should order two sets of hardware to give your door the appearance of two single-car doors.
The door industry standard in strap hinges is 16" in length.
The critical thing to remember is to ensure the hardware does not interfere with the operation of your door or is applied across door panels.
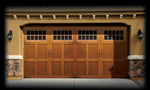
Examples of hardware on doors:
We show examples of decorative hardware in our photo gallery.
If you still need help or have questions about the right hardware for your door, you can send us a photo of your door. It is best to send us a photo BEFORE ordering. This way, you do not order hardware that will not fit on your door or your home's architectural design. Design help is free, and we can offer you different designs and pricing options. If you send photos of your door and your front door is adjacent to or compliments it, please make sure to include your front door if you are trying to accent the entire front of your home.
Still trying to figure out where to install it or if our decorative hardware will look good on your door, gate or shutters, try this excellent tip idea.
IDEAS WHERE TO INSTALL YOUR HARDWARE USING PAINTERS TAPE:
1. You will need a small roll of blue or bright green painter's tape in a thinner width to be used as your "faux hardware" examples.
2. Take the measurements of the actual decorative hardware you want to order or, if you already have, to install. Please get in touch with us if you need to know what other hardware or sizes to order.
The most common length of strap hinges is 16" with a width of 2". However, our door rings or pull handle sizes vary from 4-1/2" to 14" in length.
3. Cut the painter's tape to the lengths of the products you want to purchase. Make sure you cut even pieces for your design idea or hardware styles you are looking to purchase.
4. Apply the cut tape lengths to the locations where you would like your hardware placed on the door. Make sure there is room for both the width & length of your product, and keep in mind handles are typically installed in pairs of two, and the second door panel is up from the ground. You can install just one handle or ring on your door, but we cannot accept partial returns, so you may have an extra pull handle or door ring if you decide to use only one.
Strap Hinges: Typically, they are installed in one of the four corners of a door or below/above a glass window section if your door has glass in the top section of it. If your strap hinges are installed below the glass section, you must be sure there is plenty of space for the hinge to lie flat and not interfere with the door section joints or overlap them.
Handles or Door Rings: Typically, they are installed in the second section or #2 section up from the ground. Handles or rings are centered on this door section. If you have a two-car door over 14'-0" wide, most customers will order and install two sets of hardware or eight strap hinges and four handles/rings.
5. Go back 15-20 yards or towards the sidewalk to see what it looks like. This view is often referred to as the "Curb Appeal" view. If you're happy with the locations selected, take a photo if you have to share the tape layout with a door installer or if someone removes it.
If you are NOT happy, move the tape pieces to the desired location until it looks good. Using tape will help you avoid drilling unwanted holes in your door and share with others, not home or away.
You may find your door looks better without hinges or handles/door rings only.
If you are still determining the best tape locations, you can always send us a photo and what hardware you want to purchase for free design help.
HOW TO INSTALL HINGES AND PULL HANDLES:
Installing Decorative Strap Hinges:
Once you have determined the location of your hardware using the painter's tape tip posted above, follow the next steps for installing your decorative strap hinges. Some products may require exterior grade adhesive not supplied. Please allow any adhesive used to dry per the manufacturer's instructions before operating your door.
Step 1: Locate the strap hinge in the desired location between the section joint and the upper end of the raised panel area on your door.
Step 2: Using the strap hinge as a template, make a mark through the center hole using a washable marker or pencil. Make sure your hinge is level before marking the hole locations and does not interfere with the operation of your door.
Step 3: Using a 1/16” Drill bit, break the surface of your door's exterior metal door skin for each hinge hole location. DO NOT OVERDRILL, or your screw fasteners will not hold.
If you drill a hole too large in metal doors, add some construction adhesive to the screws when installing. To keep the hinges in place while the adhesive dries, use painter's tape to hold them until it has time to dry per the manufacturer's specifications.
NOTE: IRON & RUSTIC SERIES STRAP HINGES OR HINGES OVER 16" In length.
Step 4: If you're installing either Iron or Rustic Series Strap Hinges or any hinge over 16” in length on a steel garage door, please add a small amount of *exterior grade adhesive to the back side of your hinge before attaching to the door.
PLEASE NOTE: ADHESIVE IS OPTIONAL on solid wood or carriage house doors with exterior trim boards. Don't hesitate to contact us if you need clarification on what type of door you have.
Why adhesive on Steel doors? Steel doors have no solid core other than foam, in either polystyrene, urethane, or non-insulated. Therefore, fasteners have no place to attach to than steel skin. We recommend using a 1/16" drill bit and hand tightening so the fastener attaches to the steel and adhesive if added. Also, adding adhesive helps prevent the hardware's movement since your door is moving up & down often many times per day.
Unfortunately, since we have no control over the final install location and shipping restrictions, we cannot sell adhesives.
Step 5: Take the supplied Phillips-head screw fasteners and place one through the strap hinge and over the holes you drilled. Install an end screw first, ensuring your hinge hole for each screw is started before tightening all screws and that your hinge is level. It is best to use a handheld screwdriver to avoid overtightening your screws or if you are not comfortable using an electric drill.
Step 6: Clean off any extra adhesive that may have gotten on the face of your door surface. If the adhesive is used, allow drying per the manufacturer’s instructions, if possible, BEFORE operating your door. If you must run it, use painter's tape to help hold your hardware until the adhesive has time to cure.
NOTE: Maximum drill bit size is 1/16” drill bit.
*We recommend using Loctite brand exterior grade adhesive designed for your doors application, i.e., steel-to-steel and environment-cold/heat conditions. Loctite is available at most home centers or hardware stores.
HOW TO INSTALL HINGES AND PULL HANDLES:
Installing Decorative Door Handles or Door Rings/Door Knockers:
Installing handles or door rings follows the same process as the strap hinges. Once you have determined the location of your hardware using the painter's tape tip, as noted above, follow the next steps for installing your decorative handles or door rings.
*Some products may require exterior grade adhesive not supplied.
Step 1: Select the location of your pull handle or door ring on your door. Typically, both are found on the second panel of the door from the ground up, often referred to as the lock section or second door panel.
*IF YOU HAVE AN EXISTING LOCK SECTION, YOU CAN PLACE YOUR HANDLES/RINGS IN THE NEXT SECTION ABOVE.
For example, if you have a steel raised or recessed panel door, this is the space between those. On the other hand, if you have vertical trim boards such as carriage house overlay-style doors. In that case, you can install either handles or door rings on the center trim board in the same location vertically.
Step 2: Using the screw holes on the pull handles or door rings as a template, make a mark through the center hole using a washable marker or pencil. Make sure your handle or ring is level before marking the hole locations and evenly spaced on either side of the handle. Please note many handles are wider on the top end vs. the bottom.
Also, some door rings have smaller door stops in the box. This is designed for two reasons. 1. To make the ring look authentic and keep it from hitting the door as it opens & closes. Make sure you account for these as well as the rings when measuring.
Step 3: Using a 1/16” Drill bit, break the surface of your exterior metal/wood door skin for each hinge hole location. DO NOT OVERDRILL, or your screw fasteners will not hold. Use the same process if you have a solid wood door. Pre-drilling into wood will help prevent the wood from cracking when installing screws. Again, ensure you are only "breaking the surface and not drilling too deep, or the fasteners will not hold.
Step 4: If you're installing our Iron or Rustic Series handles or door rings on a steel garage door, please add a small amount of *exterior grade adhesive to the back side of each mounting location before attaching it to the door. This will also give ANY handle or ring extra holding power if someone tries to pull on them or if they are struck by kids playing with balls or bikes. In addition, the door's movement over time could cause the handles or ring fasteners to work loose.
*This is OPTIONAL on solid wood or carriage house doors with exterior trim boards.
Step 5: Take the handle or ring-supplied Phillips-head screw fasteners, insert them through the screw holes, and place them over the holes you drilled. Install the first screw, ensuring the handles are straight vertically and the holes for each screw are started before tightening all screws. It is best to use a handheld screwdriver to avoid overtightening your screws, or if you are not comfortable, use an electric drill to prevent overtightening.
Step 6: Clean off any extra adhesive that may have gotten on the face of your door surface. If the adhesive is used, allow drying per the manufacturer’s instructions.
NOTE: Maximum drill bit size for any handle or door ring is 1/16” drill bit.
INSTALLING NAIL STUDS -FOR WOOD DOORS ONLY:
Hardware Installing Nail Studs-Wood Doors Only
Notes on: Nail studs product information are for SOLID WOOD PRODUCT ONLY.
They are not to be used for fastening hardware to your door.
The nail portion of the stud will not fit nor secure nor fit into the screw holes on most decorative hardware.
ALSO, NAIL STUDS CANNOT BE INSTALLED ON STEEL GARAGE DOORS, ONLY SOLID WOOD PRODUCTS.
IF YOU HAVE A STEEL/METAL GARAGE DOOR, WE OFFER MAGNET DOOR STUDS OR SCREW-IN STYLE STUDS FOR SALE. Contact us for more information and assistance.
INSTALLING DOOR STUDS NAILS ONLY:
Tools Required: Nail Stud Installation
An Electric Drill, 1/16” bit, Phillips screwdriver and bit, Loctite adhesive-exterior grade-required, but not supplied, a tape measure, and blue painter's tape.
*It is recommended that you cover the hammer head with an old rag and cover it with painter's tape to protect the finish on the studs when nailing them into your door.
STEPS FOR NAIL STUD INSTALLATIONS:
Step 1: To identify the location of the hardware, use either blue painter's tape or a washable marker.
Step 2: Take your hammer and cover the head with a cut of an old rag, foam dish pad, or tape cardboard on the head-(striking area). This way, you will protect the finished surface of your door studs when pounding in the nail.
Step 3: Using tape, measure, and level the locations of each nail stud if necessary. Some people will use a chalk line to leave a level line across your door.
Step 4: Using a 1/16” bit, break the surface of your wood door. DO NOT OVER-DRILL OR DRILL DEEP INTO THE WOOD, or your stud made not hold properly. By drilling into the wood, you should prevent it from cracking when inserting the door studs.
Step 5: If you have decided to apply adhesive (purchased locally by the customer). Apply a small amount of Loctite Exterior Adhesive in each hole just drilled BUT DO NOT OVERFILL, or you will have adhesive on the surface of your door. Repeat for all other studs.
*If you are concerned about getting adhesive on your door, you can apply blue painter's tape around the nail stud area to avoid this.
Step 6: Take your hammer and nail the stud onto the door. Again, make sure your hammer's head is covered to protect the finish.
Step 7: IF POSSIBLE, ALLOW THE DOOR TO DRY WITHOUT MOVEMENT-IF ADHESIVE WAS USED.
INSTALLING SCREW-IN STYLE DOOR STUDS:
Tools Required:
Drill, 1/16” bit, Phillips screwdriver and bit, Loctite adhesive-exterior grade-required, but not supplied, a tape measure, and blue painter's tape.
*We recommend Loctite brand-exterior grade construction adhesive because it works. You will only need a small amount. Please ensure it is for exterior use only and the materials you attach the hardware too.
STEPS FOR INSTALLING THE SCREW-IN STYLE DOOR STUDS:
Step 1: To identify the location of the hardware, use either painter's tape or a washable marker while marking the location.
Step 2: Using your tape, measure, and level if necessary, note the locations of each door stud.
Step 3: Using a 1/16” bit, break the surface of your steel door surface. REMEMBER, THE STEEL SKIN PROVIDES THE ATTACHMENT POINT FOR YOUR DOOR STUD. The same for wood doors-just damage the surface & avoid boring out the holes.
Step 4: Apply adhesive (purchased locally by the customer); you will want to read this. Apply a small amount of Loctite Exterior Adhesive in each hole just drilled BUT DO NOT OVERFILL. You will have adhesive on the surface of your door, nor get ahead of yourself, or it may be set up.
Step 5: If you feel it necessary, apply blue painter's tape around the stud area to avoid getting adhesive on the finish door surface, or you can follow clean-up tips from Loctite.
Step 6: Insert the screw-in stud into the hole, making sure to go slowly to avoid getting adhesive all over.
Step 7: Take some blue painter's tape over the stud to hold it until the adhesive cures. Remember, unlike wood, if you're applying a door stud into a metal door, you need to allow the adhesive to set up. If you can, allow the adhesive to dry up to eight hours before using.
Step 8: Remove any excess adhesive from your door or hardware per instructions from Loctite.
INSTALLING IRON HANDLE SETS- Models: 70250, 70260
Drill, 1/16” bit, Phillips head screwdriver and bit, Loctite adhesive-exterior grade-required, but not supplied, a tape measure, and painter's tape in place for marking the location if unsure of the location of your handles.
GDHD/Re-Source Iron Handle Set Installation Instruction Tip:
Once you have determined the location of your hardware, follow the next steps for installing your decorative Iron handle set.
Note: You will need 2-1/4” clearance for your Iron Handle Sets.
To correctly measure this on your door, disconnect your opener, standing on the outside of your door, open the door manually until one door panel is in the radius (header opening). Measure the distance from the flat (face of that panel to the bottom of the header). You will need 2-1/4”. If you don’t have it, most doors can be adjusted by an experienced garage door company. Contact us to help you locate one and avoid damaging your door.
Step 1: Locate Iron handle set in the desired location on your door. This is typically located on the second panel of the door from the ground up, often referred to as the lock section or second door panel.
*Before you drill, make sure your handles clear the opening.
Step 2: Using the holes on the Iron handle set as a template, make sure the handles are level and placed squarely on your door. Take a pencil, pen, or even your drill bit and mark the screw-hole locations on your handles.
Step 3: Using a 1/16” Drill bit, just break the surface of the exterior metal door metal exterior of your door for each hinge hole location. DO NOT OVERDRILL or go too deep, or your screw fasteners will not hold. Use the same process if you have a solid wood door. Pre-drilling will also help prevent the wood from cracking when installing screws.
Step 4: If you're installing our on a steel garage door, please add a small amount of *exterior grade adhesive to the back side of each mounting location before attaching it to the door. This will also give the handle holding power if someone tries to pull on them or if struck by kids playing. In addition, the movement of the door over time could cause the fasteners to work loose.
This step is OPTIONAL on solid wood or carriage house doors with exterior trim boards.
Step 5: Take the handle or ring-supplied Phillips-head screw fasteners, insert them through the screw holes and tighten. Install the first screw, ensuring each hole is started before tightening all screws. It is best to use a handheld screwdriver to avoid overtightening your screws IF you are not comfortable using an electric drill.
NOTE: Please allow handles to dry for at least 8 hours before using your door.